Category: Tutorials

  • Custom Block Building Workshop

    Custom Block Building Workshop

    This is a written version of a workshop given most recently at WordCamp Rochester 2024. The workshop is more hands-on, but my hope is that the code and explanations here are detailed enough to help you in creating your first custom block.

    The code for the plugin is available on my GitHub profile, and you can walk through the commits to see the order in which the plugin is built.

    This workshop assumes a basic understanding of PHP and JavaScript, as well as a code editor and somewhere to test the code, such as a test WordPress site, or a local development environment. It does not require the use of React or another JavaScript framework, nor does it require build tools.

    I won’t be describing every single line-by-line change, but if you follow along and view the commits, you should be able to see everything that changes for each step.

    Setting Up the Plugin

    Start by creating a folder in your wp-content/plugins folder in WordPress. You can name the folder whatever you want, though I’m going with testimonial-block-workshop.

    Create plugin files

    Add new files to plugin folder

    In that folder, create three files: testimonial-block.php, testimonial-block.js, and testimonial-block.css. These files are going to hold the code to register the plugin, build the block, and style the block, respectively.

    Add plugin header code

    Add plugin header code

    The following code, placed into testimonial-block.php, will let the plugin show up in the site dashboard. This starts the PHP file and uses PHP comments as a way to register the plugin. We’re providing a name, description, version, and author. All of these show up in the dashboard, and the version is important for when updates come in the future.

    <?php
    /**
     * Plugin Name: Testimonial Block Workshop
     * Description: Basic Custom Testimonial Block with no build tools needed - Workshop Demo
     * Version: 1.0.0
     * Author: david wolfpaw
     */

    After you save this code, you should be able to go to the plugin dashboard and see your plugin! Activate it and make it look all highlighted and happy.

    A screenshot of the WordPress plugin dashboard, showing the Testimonial Block Workshop plugin activated.

    Add exit code and define version constant

    Add exit code and define version constant

    Now we’re gonna add code to the PHP file that will ensure that the plugin file doesn’t get accessed directly, and defines a constant for the version of the plugin. We’ll be using this later.

    if ( ! defined( 'ABSPATH' ) ) {
    	exit; // Exit if accessed directly.
    }
    // Define plugin version
    define( 'TESTIMONIAL_BLOCK_VERSION', '1.0.0' );

    Registering the Block

    Now that we’re setup, it’s time to register the block, so that it’s visible in the WordPress editor.

    Register PHP for the block

    register PHP for the block

    This code registers the JavaScript file for the plugin, which is where we’ll be doing the most work. Note that we first register the file with wp_register_script, and then we use register_block_type and tell it which script file to use.

    // Function to register the block and enqueue scripts/styles
    function register_testimonial_block() {
    	// Register the block's JavaScript file
    	wp_register_script(
    		'testimonial-block-script', // Unique script handle
    		plugins_url( 'testimonial-block.js', __FILE__ ), // URL of where the block file exists
    		array( 'wp-blocks', 'wp-block-editor' ), // Scripts that should load before this script
    		TESTIMONIAL_BLOCK_VERSION, // Version of the plugin script (optional)
    		true, // Is script in HTML Footer (optional)
    	);
    	// Register the block type with the scripts and styles
    	register_block_type(
    		// Block namespace and name
    		'workshop/testimonial-block',
    		// Array of arguments for the block
    		array(
    			'editor_script' => 'testimonial-block-script',
    		)
    	);
    }
    add_action( 'init', 'register_testimonial_block' );

    Register JS for the block

    register JS for the block

    In the JavaScript file, we likewise register the block. We use the same namespace and name for the block that we used in the PHP file (workshop/testimonial-block).

    The main things that we’re doing are adding a title and icon, as well as choosing the category of blocks that it will go into for when we select it. The edit and save functions right now are just returning a paragraph tag. The goal at this point is to test to ensure that we can see the block in the editor, and that when we save it, something will display on the frontend of the site.

    (function (blocks, element) {
        const { registerBlockType } = blocks;
        const { createElement } = element;
        // Step 1: Register the block
        registerBlockType('workshop/testimonial-block', {
            title: 'Workshop Testimonial Block', // Block title
            icon: 'admin-comments', // Icon from WordPress dashicons
            category: 'common', // Category in the block inserter
            edit: function () {
                return createElement('p', null, 'Workshop Testimonial Block'); // Placeholder text in editor
            },
            save: function () {
                return createElement('p', null, 'Workshop Testimonial Block'); // Placeholder text on frontend
            }
        });
    })(window.wp.blocks, window.wp.element);

    With both of these files saved, you should be able to go to edit a post or page and find your block.

    A screenshot of the WordPress editor showing the Workshop Testimonial Block that we're making

    Creating Fields to Edit Block

    Alright, now that we’ve gotten really set up, it’s time to create some fields for our block. We’re going to create some text fields, an image upload button, and color selectors.

    Add editable text fields

    Add editable text fields

    The following code adds some of the other constants that we need to make text controls, and adds two text fields: testimonialText and authorName to unsurprisingly store the testimonial text, and the author name.

    (function (blocks, element, blockEditor, components) {
        const { registerBlockType } = blocks;
        const { TextControl } = components; // Import the TextControl component
        const { createElement, Fragment } = element;
    
        // Step 1: Register the block
        registerBlockType('workshop/testimonial-block', {
            title: 'Workshop Testimonial Block', // Block title
            icon: 'admin-comments', // Icon from WordPress dashicons
            category: 'common', // Category in the block inserter
            // Step 2: Add Editable Text Fields
            attributes: {
                testimonialText: { type: 'string', default: '' }, // Testimonial text
                authorName: { type: 'string', default: '' }, // Author name
            },
            edit: function ({ attributes, setAttributes }) {
                const { testimonialText, authorName } = attributes;
                return createElement(
                    Fragment,
                    null,
                    // Add TextControl for Testimonial Text
                    createElement(TextControl, {
                        label: 'Testimonial Text',
                        value: testimonialText,
                        onChange: (value) => setAttributes({ testimonialText: value }),
                        placeholder: 'Enter the testimonial text…'
                    }),
                    // Add TextControl for Author Name
                    createElement(TextControl, {
                        label: 'Author Name',
                        value: authorName,
                        onChange: (value) => setAttributes({ authorName: value }),
                        placeholder: 'Enter the author’s name…'
                    })
                );
            },
            save: function ({ attributes }) {
                return createElement('p', null, 'Custom Testimonial Block'); // Placeholder text on frontend
            }
        });
    })(window.wp.blocks, window.wp.element, window.wp.blockEditor, window.wp.components);

    We are creating the elements that you’ll be able to see on the backend of the site, including labels and placeholders for those fields.

    a screenshot of the testimonial block backend, showing the editable text fields

    Display text on frontend

    Display text on frontend

    The save function will affect what saves tot he database to display on the frontend of the site. We’ve replaced the placeholder paragraph with a div that holds a blockquote and bolded paragraph tag for the testimonial text and the author name.

    save: function ({ attributes }) {
        // Step 3: Create Elements to Display Text on Frontend
        const { testimonialText, authorName } = attributes;
        return createElement('div', null,
            createElement('blockquote', null, testimonialText),
            createElement('p', { style: { fontWeight: 'bold' } }, authorName)
        );
    }
    a screenshot of the testimonial block frontend, showing the text fields

    Add image upload controls

    Add image upload controls

    Same as before, we add the constants needed for the media uploader. We’re going to be saving the URL of the image to use on the frontend. We’re also creating a button that says “Upload Author Image” if no image is set, and changes to “Change Author Image” if an image is already present.

    (function (blocks, element, blockEditor, components) {
        const { registerBlockType } = blocks;
        // Step 4: Add Button and Media Upload Components
        const { TextControl, Button } = components; // Import the Button Component
        const { MediaUpload, MediaUploadCheck } = blockEditor; // Import the Media Upload Components
        const { createElement, Fragment } = element;
    
        registerBlockType('workshop/testimonial-block', {
            title: 'Workshop Testimonial Block', // Block title
            icon: 'admin-comments', // Icon from WordPress dashicons
            category: 'common', // Category in the block inserter
    
            attributes: {
                testimonialText: { type: 'string', default: '' }, // Testimonial text
                authorName: { type: 'string', default: '' }, // Author name
                // Step 4: Add Image URL Attribute
                authorImage: { type: 'string', default: '' }, // Author image URL
            },
            edit: function ({ attributes, setAttributes }) {
                // Step 4: Add Image URL Attribute
                const { testimonialText, authorName, authorImage } = attributes;
    
                return createElement(
                    Fragment,
                    null,
                    // Step 4: Add Media Upload for Author Image
                    // Media Upload for Author Image
                    createElement(MediaUploadCheck, {},
                        createElement(MediaUpload, {
                            onSelect: (media) => setAttributes({ authorImage: media.url }),
                            allowedTypes: ['image'],
                            value: authorImage,
                            render: ({ open }) => createElement(Button, { onClick: open, className: 'is-primary' }, authorImage ? 'Change Author Image' : 'Upload Author Image')
                        })
                    ),
                    // Display Uploaded Image in Editor
                    authorImage && createElement('img', { src: authorImage, alt: 'Author Image' }),
                    // Add TextControl for Testimonial Text
                    createElement(TextControl, {
                        label: 'Testimonial Text',
                );
            },
    a screenshot of the testimonial block backend, showing the image upload

    Display image on frontend

    Display image on frontend

    Same as with the text, we’re now using the same code to create an image element on the frontend to display our author image.

    save: function ({ attributes }) {
        const { testimonialText, authorName, authorImage } = attributes;
        return createElement('div', null,
            // Step 5: Render Image on Frontend
            authorImage && createElement('img', { src: authorImage, alt: 'Author Image' }),
            createElement('blockquote', null, testimonialText),
            createElement('p', { style: { fontWeight: 'bold' } }, authorName)
        );
    }
    a screenshot of the testimonial block frontend, showing the uploaded image and text

    Add color control settings

    Add color control settings

    With the following four changes, we’re adding the ability to create a color panel like the color selectors that appear in other WordPress blocks. We’re saving the settings for a background color and text color for the testimonial block.

    // Step 6: Import the Panel Color Settings
    const { MediaUpload, MediaUploadCheck, PanelColorSettings } = blockEditor;
    
    
    // Step 6: Add Attributes for Background and Text Colors
    backgroundColor: { type: 'string', default: '#ffffff' }, // Background color
    textColor: { type: 'string', default: '#000000' }, // Text color
                
    
    edit: function ({ attributes, setAttributes }) {
        // Step 6: Add Attributes for Background and Text Colors
        const { testimonialText, authorName, authorImage, backgroundColor, textColor } = attributes;
    
    
    // Step 6: Panel for Color Settings
    createElement(PanelColorSettings, {
        title: 'Color Settings',
        initialOpen: true,
        colorSettings: [
            {
                value: backgroundColor,
                onChange: (value) => setAttributes({ backgroundColor: value }),
                label: 'Background Color',
            },
            {
                value: textColor,
                onChange: (value) => setAttributes({ textColor: value }),
                label: 'Text Color',
            }
        ],
    a screenshot of the testimonial block backend, showing the color settings fields

    Move image and color controls to Inspector Panel

    Move image and color controls to Inspector Panel

    Now that we’ve added more controls to our block, it’s starting to look a bit cluttered in the editor. At this point, I think that it’s reasonable to move these settings from the main block editor to the Inspector Panel that shows up on right sidebar when you have a specific block clicked.

    We’re going to move the media upload button and color selectors to the sidebar, while keeping the text fields in the main editor for now. Spoiler: we’re going to move those later as well to tidy up our block view even more.

    edit: function ({ attributes, setAttributes }) {
        const { testimonialText, authorName, authorImage, backgroundColor, textColor } = attributes;
    
        // Step 7: Move Settings into Inspector Controls
        return (
            createElement(Fragment,
                null,
                // InspectorControls Adds Settings in the Sidebar
                createElement(InspectorControls,
                    null,
                    // PanelBody for Testimonial Settings
                    createElement(PanelBody,
                        { title: 'Testimonial Settings' },
                        // Media Upload for Author Image
                        createElement(MediaUploadCheck, {},
                            createElement(MediaUpload, {
                                onSelect: (media) => setAttributes({ authorImage: media.url }),
                                allowedTypes: ['image'],
                                value: authorImage,
                                render: ({ open }) => createElement(Button, { onClick: open, isPrimary: true }, authorImage ? 'Change Author Image' : 'Upload Author Image')
                            })
                        )
                    ),
                    // Panel for Color Settings
                    createElement(PanelColorSettings, {
                        title: 'Color Settings',
                        initialOpen: true,
                        colorSettings: [
                            {
                                value: backgroundColor,
                                onChange: (value) => setAttributes({ backgroundColor: value }),
                                label: 'Background Color',
                            },
                            {
                                value: textColor,
                                onChange: (value) => setAttributes({ textColor: value }),
                                label: 'Text Color',
                            }
                        ],
                    })
                ),
    
                // Step 8: Make div to Display Testimonial in Editor
                createElement('div',
                    null,
                    // Display Uploaded Image in Editor
                    authorImage && createElement('img', { src: authorImage, alt: 'Author Image' }),
                    // Add TextControl for Testimonial Text
                    createElement(TextControl, {
                        label: 'Testimonial Text',
                        value: testimonialText,
                        onChange: (value) => setAttributes({ testimonialText: value }),
                        placeholder: 'Enter the testimonial text…'
                    }),
                    // Add TextControl for Author Name
                    createElement(TextControl, {
                        label: 'Author Name',
                        value: authorName,
                        onChange: (value) => setAttributes({ authorName: value }),
                        placeholder: 'Enter the author’s name…'
                    })
                )
            )
        );
    },
    a screenshot of the testimonial block backend, showing the media upload button and color settings fields moved into the inspector panel sidebar

    Display color changes in editor

    Display color changes in editor

    Now that we’ve moved the color and media settings to the sidebar, we can add some attributes to the div in the editor. Instead of an attribute set of null as it was before, we’re adding a JSON array that includes styles, and a class name.

    This will make inline style changes that will update when a new color is selected for either the text or background.

    // Step 9: Display Color Changes in Editor
    {
        style: {
            color: textColor,
            backgroundColor: backgroundColor
        },
        className: 'custom-testimonial-block'
    },
    a screenshot of the testimonial block backend, showing custom colors set

    Display color changes on frontend

    Display color changes on frontend

    This should look basically the same as the previous step. We’re making the save function return a div that has some style attributes and a class name. The class name we’ll be using when we do more styling at the end.

    // Step 10: Display Color Changes on Frontend
    const { testimonialText, authorName, authorImage, backgroundColor, textColor } = attributes;
    return createElement('div',
        {
            style: {
                color: textColor,
                backgroundColor: backgroundColor
            },
            className: 'custom-testimonial-block'
        },
    a screenshot of the testimonial block frontend, showing custom colors set

    Move text controls to Inspector Panel

    Move text controls to Inspector Panel

    I had an idea that I’d be moving the text controls to the Inspector Panel in the sidebar as well. While it’s not editable right where it’d be on the page, I think that it looks and acts cleaner this way, with less clutter in the display and all of the things that you’ll actually edit next to one another.

    This step involves moving the controls into the InspectorControls element, as well as creating new elements in the div in the main page editor to display the updated blockquote and paragraph tags.

    // Step 11: Move Text Controls into Inspector Panel
    // Add TextControl for Testimonial Text
    createElement(TextControl, {
        label: 'Testimonial Text',
        value: testimonialText,
        onChange: (value) => setAttributes({ testimonialText: value }),
        placeholder: 'Enter the testimonial text…'
    }),
    // Add TextControl for Author Name
    createElement(TextControl, {
        label: 'Author Name',
        value: authorName,
        onChange: (value) => setAttributes({ authorName: value }),
        placeholder: 'Enter the author’s name…'
    }),
    
    
    // Step 11: Move Text Controls into Inspector Panel
    createElement('blockquote', null, testimonialText),
    createElement('p', { style: { fontWeight: 'bold' } }, authorName)
    a screenshot of the testimonial block backend, showing all editable fields moved to the inspector panel sidebar

    Block Alignment and Styles

    We’re almost at the end! Now that we’ve made it this far, it’s time to add a bit of style to our testimonials. We’re going to do this in two ways: add support to allow you to change the alignment of the testimonial block, and add some custom styles for it.

    Add block alignment support

    Add block alignment support

    We’re adding a new parameter to our block: supports. This will let us use an existing feature in the block editor to control alignment. I’ve set all five core options, to allow us to float the testimonial block, or to make it wide or full width on the page. We set an attribute with whatever is saved to allow it to display properly.

    Unlike with the custom attributes that we created, we don’t need to add this to our edit or save functions.

    // Step 12: Add alignment support
    supports: {
        align: ['left', 'center', 'right', 'wide', 'full'], // Supports alignment options
    },
    attributes: {
        testimonialText: { type: 'string', default: '' }, // Testimonial text
        authorName: { type: 'string', default: '' }, // Author name
        authorImage: { type: 'string', default: '' }, // Author image URL
        backgroundColor: { type: 'string', default: '#ffffff' }, // Background color
        textColor: { type: 'string', default: '#000000' }, // Text color
        blockAlignment: { type: 'string', default: 'none' }, // Block alignment
    },
    a screenshot of the testimonial block backend, showing the block alignment options

    Register block stylesheet

    Register block stylesheet

    Finally touching that PHP file again! The main things of note here are that we are registering the stylesheet that we already created, testimonial-block.css, and telling WordPress where it can be found. We are then adding style_handles to the register_block_type function. This is an array, since there could be more than one stylesheet added.

    You do have the ability to specify stylesheets for the frontend and backend of the site separately, but in our case we’re going to have the same one apply, since it isn’t too hard on this simple block to style to look the same to visitors as it does while editing.

    // Register the block's styles
    wp_register_style(
    	'testimonial-block-style', // Unique stylesheet handle
    	plugins_url( 'testimonial-block.css', __FILE__ ), // URL of where the stylesheet file exists
    	array( 'wp-edit-blocks' ), // Stylesheets that should load before this script
    	TESTIMONIAL_BLOCK_VERSION // Version of the plugin script (optional)
    );
    // Register the block type with the scripts and styles
    register_block_type(
    	// Block namespace and name
    	'workshop/testimonial-block',
    	// Array of arguments for the block
    	array(
    		'editor_script' => 'testimonial-block-script',
    		'style_handles' => array( 'testimonial-block-style' ),
    	)
    );

    Add block styles

    Add block styles

    And now we’re finally using our CSS file!

    Nothing very special of note here. This code:

    • makes a box and adds a border to it (same color as the text color)
    • centers the image and text
    • rounds the image to a circle and adds a border to it as well (same color as the text color)
    • makes the block quote look a bit fancy with a large quotation mark
    • bolds the author name
    .custom-testimonial-block {
        text-align: center;
        padding: 20px;
        border-radius: 20px;
        border: 3px solid;
        font-size: 1em;
    }
    .custom-testimonial-block img {
        border-radius: 50%;
        border: 3px solid;
        background-color: #fff;
    }
    .custom-testimonial-block blockquote {
        font-size: 1.5em;
        padding: 50px;
        font-style: italic;
        position: relative;
    }
    .custom-testimonial-block blockquote::before {
        content: '“';
        font-family: sans-serif;
        font-size: 4em;
        line-height: 1;
        position: absolute;
        left: 10px;
        top: -10px;
    }
    .custom-testimonial-block p {
        font-size: 1em;
        font-weight: bold;
    }

    You probably noticed that the author name was already bolded before. That’s because we originally used this:

    createElement('p', { style: { fontWeight: 'bold' } }, authorName)

    Now we removed the style attributes, to get this:

    createElement('p', null, authorName)

    The main reason that I made this change is just to keep styling consistently in one area, so that we can more easily make changes to it in the future if we want.

    Final Thoughts

    I realize that was a lot to go through at once. I don’t blame you if it takes a few tries (it took more than a few for me!) or requires a few sessions and examples to get it down.

    This is just one way of building a custom block, and not how most that you will see will look. That’s because instead of using the fancy and very helpful @wordpress/create-block tooling, I opted for something that would not require you to learn any build tools, how to use the command line, or having a separation of source and build files.

    From here I want you to go out and create custom blocks that are useful for your own sites, and share them with the world! I’ll be happy to showcase some if you reply with a link to what you end up building.

  • An Incomplete Guide to Getting Started on Mastodon

    An Incomplete Guide to Getting Started on Mastodon

    Last week I wrote an article about misconceptions around Mastodon and the Fediverse. I got a lot of great feedback from that article, but I also got one question a lot: what is Mastodon, exactly?

    I didn’t want to address this in that article, as it’s worthy of a full post of its own. I realize that this would be more introductory to the point that it should be read before that article if you just want to create an account and get started using it.

    Table of Contents

    An Overview of What Mastodon Is

    Mastodon is a decentralized, federated social network. It is decentralized in the sense that there is no one company running Mastodon, and there are instead multiple websites that exist, allowing for flexibility, durability, and freedom for the network overall, as opposed to one organizational voice and set of servers. Mastodon is federated in that those separate servers (called instances) can converse with one another. This allows for networks of scale to exist as they do on centralized social networks. An individual instance may have a few dozen or hundred members (or even just one!) and still be able to connect to hundreds of thousands of other accounts with ease.

    The aesthetic of the web and mobile apps to access Mastodon are similar to Twitter and Tweetdeck. If you’re comfortable with Twitter already, you’ll be able to mostly navigate Mastodon with little help.

    The idea of Mastodon is to create small communities with their own spaces, as opposed to one large forum like Twitter, Instagram, or Facebook. Think of it more like how Reddit has separate communities in subreddits, or how Facebook has groups that require membership to access.

    Unlike Reddit and Facebook however, Mastodon is not hosted monolithically by one large company that contains all communities. Instead, different system administrators maintain their own Mastodon groups (instances), and each instance functions separately of one another on different domains. I run a Mastodon instance of my own at the domain tech.lgbt.

    Within an instance, the admin has complete control. This is seen as a positive or negative, depending on the community and the user (see my section on “What is True Federation?” in my misconceptions article). They can set the tone of the conversation in the space, and police as they see fit.

    How Does Mastodon Compare to Twitter and other Social Networks?

    On Twitter, you have to follow the Twitter Code of Conduct, for better or worse. Twitter can choose to block your account for a limited time or ban you permanently if they think that it is required. Considering the scale of Twitter and the number of messages posted daily, it’s no surprise that moderation is mainly handled algorithmically, which leads to a very opaque process. This can lead to gaffes including the temporary ban of Twitter’s own CEO, Jack Dorsey.

    Mastodon, on the other hand, has all moderation handled by individual people, often one person for an instance, or maybe a small handful of admins and moderators. This doesn’t mean that the system is necessarily better, but it does allow for a human touch that is so desperately needed where human speech is concerned.

    If you do want to keep your Twitter account and use both, as I do, you can use a cross-poster to let you use both services together. I use moa.party, which allows you to link your Mastodon account to both Twitter and Instagram and cross-post between them. These services aren’t perfect, in part because the platforms work different, and because of limitations in the APIs of the closed networks.

    How do I Create an Account?

    There is no one place to create a Mastodon account. Instead, you choose a community that you want to be part of and create an account there. As an example, my instance, tech.lgbt is for LGBTQIA+ folks and allies with an interest in technology. One of the faster growing instances for furries that I’ve seen is snouts.online. Some users who got banned from Tumblr in late 2018 after their adult content ban have gathered at humblr.social (no longer online). A community for artists exists at mastodon.art, board gamers at boardgames.social, and even a private instance for video game slimes at slime.global.

    The last instance is an example of a private instance. This means that the administrators set it up so that new users are either barred from creating accounts, or need to have one created for them by an admin. This is another one of the ways where Mastodon separates itself from Twitter and other networks. Users and admins are welcome to create their own spaces, manage them as they see fit, and interact in ways that are comfortable to them.

    The account that you create will be findable via your username and instance name. For instance, I use the rather clever username of david, and am on the instance tech.lgbt. Therefore, my full username to send messages to is @david@tech.lgbt. Think of it like a hybrid of Twitter and email addresses.

    Do I Need Accounts on Each Instance?

    Long story short: no, you only need as many accounts as you want identities. You can probably interact with others that you want to from whichever instance you choose.

    At this point you might be thinking about where to signup for an account and how much that matters. After all, you may be interested in both art and technology, or a specific political ideology as well as something more esoteric like fairies. Thankfully, you don’t generally need to worry about where you sign up for an account, because you can still interact with people on separate instances thanks to the most powerful feature of Mastodon: federation.

    What is Federation Again?

    Federation is, in simplest terms, how users at various Mastodon instances (or other, compatible websites like micro.blog, Pleroma, and Write Freely) interact with one another. If a Mastodon instance federates with (allows connection to) my instance, then users there can send a message to @david@tech.lgbt, and I’ll receive the message, get notified, and be able to respond just as if I was using Twitter.

    The reason that federation is such a powerful tool is because it provides options. I have a defined Code of Conduct on my instance that I enforce, and I take all moderation requests seriously. You may not agree with my moderation standards, but may still want to interact with me or other users on my instance. You can then join another instance and still be able to hold those conversations.

    By default Mastodon installs fully federated, with the ability for users on any instance to interact with any other. I’ve blocked a few instances based on the needs of my community and my own views. For instance, I’ve blocked instances that are created solely for spam, or instances that are more toxic in general for either harassers or migrations from Gab. Many instances also block others for spamming, or for hosting content that may be illegal in other countries, like the instances run by Pixiv in Japan.

    How do I Find People to Follow?

    Since Mastodon is a bit decentralized, it can be hard to find people to follow at the start. There’s no suggestion tool like Twitter has, and no tailoring based on who else you follow and where you live. Part of the allure of Mastodon is that it does so little algorithmically, and instead you are in control of your feed. There are also no trackers to help give the insight that other social networks have.

    There used to be a search tool at joinmastodon.org to connect your Twitter and Mastodon accounts together then find who you follow on Twitter also has a Mastodon account. That tool is sadly down, and I don’t know if it is making a return.

    A lot of users do #FollowFriday’s, similar to what used to be more commonplace on Twitter. There is also a nice opt-in directory called Trunk that has users on various instances, sorted by topic that they like to talk about.

    I reached out on Mastodon to ask how people find others to follow. One response reminded me of a feature that I didn’t highlight before: instance directories. This response from patter gave a few suggestions covered above, and the following advice:

    there are profile directories on some instances, you can browse those & add your own profile to them, and your profile isn’t in this public directory by default.

    @patterfloof@meow.social
    profile directory of tech.lgbt Mastodon instance
    Users can opt-in to the profile directory to be easier to find

    Additionally, I got a suggestion from one of my favorite mutuals, Winterfang, about using who you already follow to find new people to follow. This is how I found most of the people that I follow now on Mastodon, which is a good alternative to only finding people that I already know IRL.

    I just look at the local timeline and follow people who look interesting. I never use the federated timeline at all, personally. Then the local people I’m following boosted some really great people, so I followed them too.

    @icewolf@meow.social

    What are the Cultural Norms Around Mastodon?

    Most instances have policies around what is acceptable behavior and what is not. A good instance will have some form of Code of Conduct for users to abide by. Having some rules in place makes a safer and more enjoyable space, and having the rules written out publicly makes moderation more transparent.

    We’re not a free speech absolutist, and there are instances available for that. We’re not interested in Nazis, TERFS, or hate speech of any sort, which we will define at our sole discretion as moderators.

    This instance is meant to be a friendly, welcoming space to all who are willing to reciprocate in helping to create that environment.

    Short Version excerpt from the tech.lgbt Code of Conduct

    Users are generally encouraged to create introductory posts that they can then pin to their profiles. Use the hashtag, as well as hashtags for things that you’re focusing on in your account. Let people know who you are so they have reason to follow you!

    Content Warnings are also encouraged on most instances. These are notices that you can place over the content of your messages, which will the require viewers to acknowledge and click through before reading the content. These are used for things like nudity, charged topics like politics and mental health posts, or even more benign content that all users may not want to see. Using CWs where appropriate is being a good neighbor to other users, as is adding descriptive text to images that you post.

    Examples of Mastodon content warnings
    Content Warnings can be included to hide toot content. Images can also be marked as sensitive.

    How Do Locked Accounts Work?

    Accounts on Mastodon can be locked, not unlike Twitter. What sets them apart though is that locked accounts can still make public toots. Instead of having to have an all or nothing approach to privacy, you can set it on your own terms. You can even post toots that are unlisted, visible only on your profile page.

    screenshot of Mastodon posting interface with post visibility setting toggled visible
    By default Matsodon allows Public, Unlisted, Followers-only, and Direct Message posts

    Many people on Mastodon lock their accounts to control who is allowed to follow them or not, and you may have to have a follow request accepted. Best behavior is to have your profile filled out with a name and profile photo, as well as a pinned post with the hashtag to make it easy for people to learn about you and decide whether they want to allow you to follow them. We’re here to make friends, not broadcast announcements!

    *hat tip to @dysphoricunicorn@cybre.space for this tip, in their post on using the fediverse

    How Exactly Do I Get Started?

    First, you sign up for an instance. This is easier to do from the web, since most mobile apps only allow you to login to existing accounts. Usually you can go to the homepage of whatever instance that you want to sign up for to create an account, provided that it’s not a private or closed instance.

    When you’re signed up, you can use a mobile app to interact with Mastodon. I recommend Amaroq if you are on iOS, and Tusky if you are on Android. You’ll notice that these and most Mastodon apps have very mixed reviews, often lots of five-star reviews pulled down by one-star reviews. Read some of the reviews and you’ll often notice that low ratings are based around coordinated campaigns from users on instances that are unhappy with built-in blacklists. When Gab abandoned their own codebase and moved to Mastodon they brought all of their existing community issues with them.

    If you are looking to find an instance to join, instances.social is a database that lists some information about various instances, including the main languages of the instance, how many users there are, what kind of content is allowed or prohibited, and what the focus of the instance is. The website is a good guide to find some instances to start with, but some of the data isn’t always correct. As an example, my instance currently shows as down, closed to registrations, and with poor uptime. All of which I’d question considering I use it daily 😂

    With all of that out of the way, get started on the fediverse! You’ll learn a lot more by jumping in and joining the conversation. If you want more technical details, documentation, or getting started guides, check out https://joinmastodon.org/. See you there, and if you want to say hi, I’m @david@tech.lgbt

    Also, I’ve rebooted my weekly newsletter which focuses on things that I’ve found interesting around the web. Subscribe and I promise I’ll only spam you in the best way!


    Terminology

    Toot: An individual status update. Analogous to a Tweet on Twitter.

    Boost: Sharing a Toot to other users who follow you, dependent upon the visibility of the original Toot and your account. Analogous to a Retweet on Twitter.

    Content Warning: An optional field while composing a Toot that allows you to hide the content of your Toot behind a button with some notice text. Often used as a warning for content such as nudity, mental health, politics, and other subjects that some users would prefer to control visibility of. Some instances police Content Warning (shortened CW) notices more than others.

    Instance: A specific server running Mastodon. Generally denoted from one another by the domain name that accounts are registered at. An instance can be made for only one user, or can be open to hundreds or thousands of users.

    Federation: The ability for Mastodon instances to interact with one another. Open by default, can be modified or closed down entirely by admins.

    Fediverse: An informal name for the network of sites that federate with one another, This includes Mastodon, as well as other ActivityPub or oStatus based services like micro.blog, PixelFed, Pleroma, and others.

    birdsite: An often derogatory term used to describe Twitter.

    Resources

  • Squeezing More Performance From My Site

    Squeezing More Performance From My Site

    One of the things that I handle for clients at FixUpFox is site speed optimization. I also help with performance optimization, which I almost lumped into this post, but I think that it deserves its own overview at a later date.

    I also began blogging more regularly on this personal site, thanks to the support from the Blogging Accountability Group that I formed with a few members of the WordPress Orlando Meetup. One of the things that I want to do is to improve the theme that I use on the site, and one of the ways that I want to do that is to improve site speed.

    There are quite a few reasons to want to improve the speed of a site. Most concerning to me are based around resource usage and visitor experience. Loading a smaller page does a lot of good, including:

    • Less bandwidth and resource usage for visitors, improving loading speed and battery life
    • Lighter energy usage footprint, reducing ecological impact slightly

    Here’s a quick overview of what I did for my personal site, which can be what I do for a client site, depending on their needs. I have to note that I don’t do much in terms of tracking on my site, and I don’t run ads. Those are often the two biggest blockers that I have to increase page performance for clients.

    A baseline of performance

    The first thing that I do is establish a baseline of the site. That lets me get an idea of what improvement that I end up with, but also places to start looking at making changes.

    The following data was from my WordCamp Atlanta Review post tested with tools.pingdom.com. I also use Google PageSpeed Insights, Lighthouse, and GTMetrix depending on what I’m looking for.

    Performance grade: C — 77
    Page size: 1.1 MB
    Load time: 1.37 s
    Requests: 56

    The above indicates that I loaded 1.1MB worth of data on this page, taking an average of 1.37 seconds over their tests, and that 56 separate files were requested to load this page.

    This isn’t terrible, but I had a feeling that I could do better with a few simple changes.

    Removing Unused Scripts, Styles, and Fonts

    First, I started by reviewing external requests. That includes any JavaScript files, CSS stylesheets, and fonts that load along with the rest of the page. I had 56 requests being made to load that page, which is far from unusual, but a bit high for a personal post about a trip on my non-monetized site.

    Boilerplate Scripts

    A plugin that I use to manage things like my Speaking custom post type was made with the WordPress Plugin Boilerplate. That helped save time in setting the plugin up, but it also added a bit of code that I didn’t need, including display script and style files which I wasn’t making use of. Eliminating the code that called those files eliminated two requests that did literally nothing at all.

    jQuery Migrate

    Next, I looked at jQuery Migrate. This is a script that WordPress loads to help manage old code. It acts as a bridge between the latest versions of jQuery and code that is written for very old versions of jQuery. Since my site is running up to date code in the theme and plugins, I could remove this script. I can’t always say that it is possible to remove it, but you can try and see if anything breaks on your site. Most current themes and plugins have no need for it, so I removed it with the following code taken from this Dotlayer article.

    //Remove JQuery migrate
    function remove_jquery_migrate($scripts)
    {
        if (!is_admin() && isset($scripts->registered['jquery'])) {
            $script = $scripts->registered['jquery'];
            
            if ($script->deps) { // Check whether the script has any dependencies
                $script->deps = array_diff($script->deps, array(
                    'jquery-migrate'
                ));
            }
        }
    }
    
    add_action('wp_default_scripts', 'remove_jquery_migrate');


    FontAwesome

    Next, I looked at FontAwesome. loading the script to enable that on my site was the largest file, accounting for around 25% of the page load size.

    I really like FontAwesome. It’s made it a great way to get social icons and other useful site iconography without having to find and load new pictures for each. Plus, it flows smoothly between code, the content editor, and stylesheets.

    It turns out that I was only using three icons from FontAwesome across the entirety of my site: the hamburger mobile menu icon, the X close icon when the mobile menu was open, and the moon icon for the basic night-mode that I have a feeling no one even realizes is for that purpose (more on that in the future).

    Since I didn’t have a lot of icons to replace, I decided to rebuild those in CSS only. There are a variety of places to find tutorials on drawing in CSS, something that I hope to do in the future as well. For now, I redid those icons in CSS and removed reference to FontAwesome from the theme, saving a lot of the page size in the process.

    WP Emoji

    WordPress has its own emoji loading, which is useful for the amount of times that I like inserting a 🐺or a 🐾 or a 😝into what I’m writing. But you can see from the previous sentence and my bio at the end of posts that I still have them displaying with system defaults of pretty much every device that would view my site without having to load them.

    I’ve used the following code to blanket remove the WordPress emoji from my site load, though you might have reasons for keeping some of these on.

    /**
     * Disable the emoji
     */
    function disable_emoji() {
    	remove_action( 'wp_head', 'print_emoji_detection_script', 7 );
    	remove_action( 'admin_print_scripts', 'print_emoji_detection_script' );
    	remove_action( 'wp_print_styles', 'print_emoji_styles' );
    	remove_action( 'admin_print_styles', 'print_emoji_styles' );
    	remove_filter( 'the_content_feed', 'wp_staticize_emoji' );
    	remove_filter( 'comment_text_rss', 'wp_staticize_emoji' );
    	remove_filter( 'wp_mail', 'wp_staticize_emoji_for_email' );
    
    	// Remove from TinyMCE
    	add_filter( 'tiny_mce_plugins', 'disable_emoji_tinymce' );
    }
    add_action( 'init', 'disable_emoji' );
    
    /**
     * Filter out the tinymce emoji plugin.
     */
    function disable_emoji_tinymce( $plugins ) {
    	if ( is_array( $plugins ) ) {
    		return array_diff( $plugins, array( 'wpemoji' ) );
    	} else {
    		return array();
    	}
    }


    Handling Images

    I realized that a lot of images were returning too large on my site. This means that I had a space where an image would load, say an 80px square for a profile icon, yet a larger 512px square was loading for it.

    In this case the issue was Webmentions, which I was handling via an IndieWeb plugin. I was showcasing people who liked or retweeted my post on Twitter, as well as those who commented on it.

    A whole discussion should be had about the display of metrics, the privacy of individual interaction, and a need to prove popularity through that interaction. For now, my focus was on speed, and I’ve turned off profile image loading. I’m going to be reviewing my usage of this type of interaction demonstration, while still showcasing some cool features that IndieWeb proponents have given us.

    Resizing default media sizes

    The large image size on my site was set to the default of constraining to a box of 1024px by 1024px. This is a good default for some sites, but for me I had nowhere that images were displaying that large generally, even on wide screens. There were images loading that had to be resized by the browser and ended up loading larger files than needed.

    If you are on your site dashboard, you can go to the Settings panel on the left sidebar and select the Media page. There you can change the default media settings to sizes that make sense for you. In my case, I made thumbnails a different size to fit my design. They ended up being larger than the default, but allowed me to avoid having to crop to fit featured images manually, and are smaller than the medium size that I would have otherwise loaded. I also made large images constrained to an 800px by 800px box, which is around 61% of the size of the original image size. This is still large enough for my theme, but saved some space in what is often the largest portion of page load.

    If you change your image size on an existing website, you’ll also want to regenerate the cropped and resized image files that WordPress makes. The plugin Regenerate Thumbnails is my go-to for this task. You can even set it to only resize featured images, if those are the only ones that need to change.

    Performance improvement after making changes

    Now that I’ve made a handful of changes, it’s time to test the site again to see how we’ve done. I’ve gone back to tools.pingdom.com and ran the test again, being sure to select the same server location to get comparable results.

    Performance grade: C — 80
    Page size: 563.2 KB
    Load time: 442 ms
    Requests: 36

    The performance grade has barely gone up, but that’s more of an overall estimation based on what they think is important, which doesn’t always apply to your site. What has improved is the page size, which is about half of what it was before optimization. That’s already a huge savings! It’s also loading in about a third the time, and I was able to remove 20 requests from the page load.

    At this point we could probably be done and move on, but I figured I’d try a few other small things to improve page speed. I wasn’t doing any concatenation of files, and that seemed like the next best place to reduce the number of requests, increasing load speed.

    What about performance optimization plugins?

    I have used a few plugins for minification and concatenation in WordPress. Minification means stripping out unnecessary spaces and comments in files that make them much easier to read for humans, but aren’t needed by the computer. Concatenation is taking files and combining them together into one larger file. While it takes up more space it is one fewer request to make, which again can be a big driver in performance and speed.

    Fast Velocity Minify and Autoptimize are two free plugins with a variety of free and paid extensions that you can take advantage of. I’ve never used the paid extensions to offer any insights, but the free versions work very well.

    In this case I chose Fast Velocity Minify, which I installed on my site and activated with default settings only, no modification. Running the speed test again gave me the following results:

    Performance grade: A — 91
    Page size: 607.3 KB
    Load time: 443 ms
    Requests: 19

    There’s a few things to note here. The performance grade greatly improved, and the number of requests was cut nearly in half, which is a big contributor to that score.

    But we also see that load time is basically unchanged, and the page size actually increased, despite the fact that we tried shrinking the number of files that loaded.

    These optimization plugins can do great things for your site, though they can also add headaches with another layer of caching and the possibility that concatenation breaks the order that scripts need to load to function. I still use them on a lot of sites, but I think it’s important to note that they aren’t a magic fix and are a bit more complex in how they handle your site content.

    tl;dr — A recap of what I did to improve performance

    I’m going to let the following screenshot (that I optimized, of course) from Google PageSpeed Insights speak for itself in terms of what a few minor changes that took me about an hour worth of work did for my site.

    And here are the results that I got for the site at various testing times:

    Before OptimizationAfter OptimizationAfter Optimization Plugin
    Performance gradeC — 77C — 80A — 91
    Page Size1.1 MB563.2 KB607.3 KB
    Load Speed1.37 s442 ms443 ms
    Requests563619

    I’ll encourage you to consider deeply what optimization steps apply to your website and which don’t, but here’s a short list of things that I did that you could try.

    As a reminder, I am basing this case study on a personal site that does not run ads (though it has a Patreon to support my writing and tutorials!), and uses a single Google Analytics tracking script. When it comes to sites that do extensive tracking or use advertising networks, there are a host of other things to consider.

    I hope that the above gives you a place to start when you begin looking at increasing performance and speed on your site. Now go make the web faster and better!

    Fediverse Reactions
  • What is WP_DEBUG for and how do I use it?

    What is WP_DEBUG for and how do I use it?

    PHP normally only displays fatal errors in the browser, or doesn’t load any page content and gives you a “White Screen of Death (WSOD)” if it has a fatal error before the page can load. A fatal error is one in which something is so wrong in the PHP code that it cannot make sense of it to gracefully fail in the background. If I forget to add chocolate chips when making cookies, I still have a perfectly tasty dough. If I forget to add baking soda though, I end up with a flat, gooey mess.

    WordPress has a few features built in to make it easier to see PHP errors while you are testing. You’d want to activate these while developing a new site, theme, or plugin to ensure that you are seeing any PHP errors that come up.

    As mentioned in the last post on PHP Illegal Strings, there are a few failure types in PHP including warnings, notices, and errors. Turning on WP_DEBUG will allow you to see those failure types so that you can fix them in your code.

    Activating WP_DEBUG

    If you have access to all of the files of your WordPress install, you’ll want to edit the wp-config.php file, which is located in the root directory, meaning the same folder that has the wp-admin, wp-content, and wp-includes folders. You’re going to go into that file and add the following line of code near the bottom of the file, but before the stop editing notice:

    define( 'WP_DEBUG', true );
    
    /* That's all, stop editing! Happy blogging. */

    If that line already exists but says false, change that to true. There can be other lines of code above or below this, but as long as it’s above the comment to stop editing, it’s in the right spot.

    What did we do?

    We’ve now told WordPress that rather than hide PHP errors, we want them to display while viewing the site. WP_DEBUG is a PHP constant, which by convention are written in all caps. We’ve used the PHP define() function to set the value of that constant to a boolean true. Note that we didn’t surround the word true in quotes, otherwise PHP would read it as a string.

    Using WP_DEBUG also allows us to see any deprecated functions that are running on our site. Deprecated functions exist in WordPress but are no longer the standard way to perform a particular tas. As an example, long ago in WordPress history you would get the ID of a category in WordPress with the function the_category_ID(), but now the function to do the same in a better way is get_the_category().

    Using WP_DEBUG_LOG and WP_DEBUG_DISPLAY

    There are some companions to WP_DEBUG that can be used to make it even more helpful. You may not always be able to easily see errors if they are loading behind content, or you may want to keep track of them over time to review later. Two other constants that are built into WordPress that can help are WP_DEBUG_LOG and WP_DEBUG_DISPLAY.

    Using WP_DEBUG_LOG

    Setting up WP_DEBUG_LOG allows you to save all of the debug errors that are getting displayed to a file in your WordPress install. That file gets saved to wp-content/debug.log by default. Whenever an error occurs that WP_DEBUG would display, it will also get saved to that file with a timestamp of when the error occured.

    To turn on WP_DEBUG_LOG you’ll want to define the following constant:

    define('WP_DEBUG_LOG', true);

    You don’t have to worry about creating the debug.log file if it doesn’t already exist. WordPress will do this for you automatically as soon as it has an error to log. So hopefully not right away!

    Changing WP_DEBUG_DISPLAY

    By default, setting WP_DEBUG to true will display all errors on the screen in your browser, on both the visitor-facing frontend, and the admin-facing backend of your site. This is ok while you’re editing a site that isn’t live with other people using it, but you don’t really want those errors displaying to other site visitors. It will make the site look more broken than it is, and can even be a security concern.

    If you want to use WP_DEBUG but don’t want to display errors to the screen, set the following constant:

    define('WP_DEBUG_DISPLAY', false);

    Again, if you don’t set that as false, it will default to true when debug is turned on. If you are setting it to false, you’re probably also setting WP_DEBUG_LOG to true, since otherwise you won’t see the errors on the screen or in a debug log.

    If you want to passively log errors for review later on a live site, just in case any come up, you can combine the three definitions above to turn on debug mode, log errors, and stop them from displaying on the site. I recommend doing this if you don’t have anything else handling these error logs for you, which you’d probably know if you did.

    // Enable WP_DEBUG mode
    define('WP_DEBUG', true);
     
    // Enable Debug logging to the /wp-content/debug.log file
    define('WP_DEBUG_LOG', true);
     
    // Disable display of errors and warnings 
    define('WP_DEBUG_DISPLAY', false);

    Continuing to Debug Your Site

    The settings above display PHP errors, but they don’t actually do anything to fix them. You’ll need to handle that yourself. Still, they provide an invaluable source of information to determine why something is broken on your site. This won’t show all types of errors that could occur, since not all broken page or feature problems are PHP related.

    What it does do is give you a good footing to begin the fun part of debugging: digging into code and squashing bugs as you find them. In this case the old proverb is true: Knowledge is Power.

    Fediverse Reactions
  • PHP v7.1 and v7.2 Illegal Strings

    PHP v7.1 and v7.2 Illegal Strings

    An update to Yoast SEO v11.1 came out yesterday, causing a few site errors relating to illegal strings in PHP. It made me dust off this post to provide some detail on what that PHP warning is, why it is happening, and how it can be fixed.


    Last year I updated all existing client sites that I could to PHP version 7.2, to replace versions 5.6 and 7.0, both of which reached their end of security update lifespans in December of 2018. The current plan for WordPress v5.2 is to drop support for versions of PHP below 5.6, which is targeted to be released on 7 May. If this goes well, the minimum PHP version will be bumped to 7.0 later this year.

    We’re only a few weeks away from this change, and a lot of hosts have been informing users that their version will change, or that they should opt-in to update when they can. One issue is that there are some things that work in earlier versions of PHP that will now throw warnings, notices, and errors in newer versions. One of the ones that I had to contend with on a few sites recently was the “Illegal string offset” warning.

    Warning: Illegal String Offset

    Here’s a few warnings that appeared on a development version of a site that I was upgrading (file path removed for readability):

    __Warning:__ Illegal string offset 'menu' in [file location] on line 13
    __Warning:__ Illegal string offset 'post_types' in [file location] on line 25
    __Warning:__ Illegal string offset 'post_formats' in [file location] on line 36
    

    I’m noting that it’s a development environment, because I had WP_DEBUG set to true in my wp-config.php file, which I don’t do on live, production environments. Basically, I ensure that on a live version of a site I don’t have PHP errors/warnings/notices displayed, even if there are some that would otherwise display.

    I took a look at that file, which was a configuration file for the theme being used. The relevant lines from that file are below:

    /*
     * Theme menu
     */
    $theme['menu'] = array(
        THEMENAME,
        'Slideshow',
        'Sidebars',
        'Style',
        'Upload your fonts',
        //'Help'
    );
    
    /*
     * Post types
     */
    $theme['post_types'] = array(
        'Posts',
        'Pages',
        'Works',
        'Testimonials',
    );
    
    /*
     * Post formats
     * aside, gallery, link, image, quote, status, video, audio, chat
     */
    $theme['post_formats'] = array( 'gallery' );
    

    Can you spot the issue? I didn’t immediately see it myself, as I saw things like $theme['menu'] and thought “how can that be read as a string? The braces clearly indicate that we’re setting an array key.

    Explicitly Declaring an Array in PHP

    What I didn’t realize was that we were missing something that’s necessary as of PHP v7.1.0: an explicit declaration of the variable $theme as an array. If you take a look at the PHP.net manual entry on PHP Array Syntax Modifying, you’ll see the following note:

    Note: As of PHP 7.1.0, applying the empty index operator on a string throws a fatal error. Formerly, the string was silently converted to an array.

    So there’s our issue, and with it, a lead on a solution: the theme never explicitly declared the variable $theme to be an array, and so it was assumed to be a string. Since it is no longer being silently converted, we have a warning being thrown.

    Fixing the Illegal String Offset Warning

    The solution in this case is to add a line to the start of that block of code where we explicitly declare our variable as an array. What that looks like is this:

    $theme = array();
    
    /*
     * Theme menu
     */
    $theme['menu'] = array(
        THEMENAME,
        'Slideshow',
        'Sidebars',
        'Style',
        'Upload your fonts',
        //'Help'
    );
    

    By adding $theme = array();, we’re telling PHP, “yes, this is an array, please treat it as such.” It doesn’t have to try to guess what we mean, which newer versions of PHP no longer do anyway.

    PHP v7.0+ also introduces strict typing, which is great for being even more explicit in your PHP coding. This makes the code more secure (people can’t put different data types in than you intend), and less liable to break (you will always know what type of data to expect). If you want to learn a bit more, Eric Mann wrote a short introductory post on the topic early last year.

    PHP is getting better and better all the time, but this progress sometimes causes old code to break. While this is frustrating, it can also give you the opportunity to review old code with fresh eyes. It’s not always convenient to do this, but it can overall improve your site!

    Fediverse Reactions
  • How to Remove the Genesis SEO Settings

    How to Remove the Genesis SEO Settings

    If you’re like me, you don’t do much for SEO on your site. If you’re a better marketer than me and also have tools that you use for SEO, you probably don’t use the built-in SEO tools with the Genesis Theme Framework.

    The tools do their job and are already there if you want to use them, but they can be limiting, as well as duplicate work being done with any other SEO plugin that you may be using. You can choose not to use them, but they still take up some valuable space in your dashboard and while editing pages, and they can be a bit confusing if you’re handing the site off to someone else to manage.

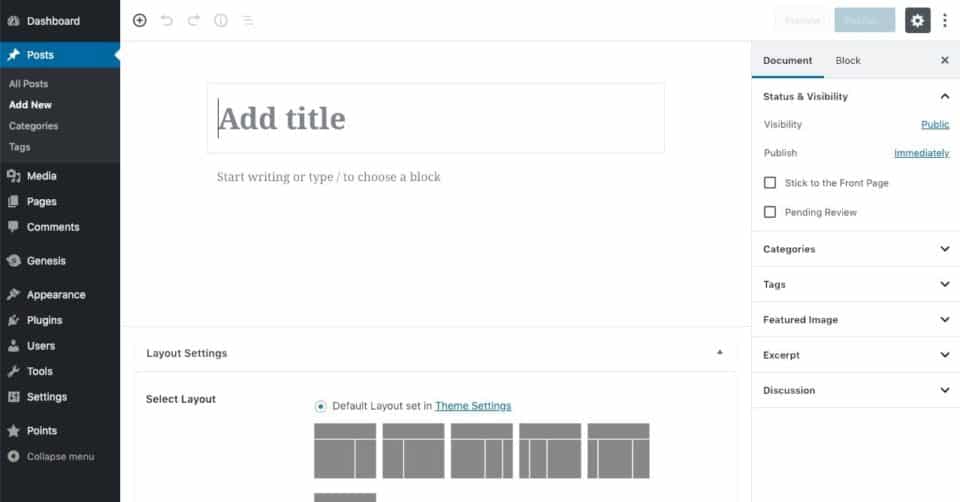
    WordPress Gutenberg post editor with Genesis SEO enabled
    Look at all of that space devoted to an unused settings section!

    Removing the Genesis SEO Settings

    One of the many great things about Genesis is that it allows you to easily modify or remove various portions of it without having to directly edit the core files of the theme. This allows you to modify your child theme only, so that if you ever switch child themes or Genesis updates, your changes won’t break.

    Place the following code in your functions.php file, or another file that loads on the dashboard.

    // Remove Genesis SEO settings from post/page editor
    remove_action( 'admin_menu', 'genesis_add_inpost_seo_box' );
    
    // Remove Genesis SEO settings option page
    remove_theme_support( 'genesis-seo-settings-menu' );
    
    // Remove Genesis SEO settings from taxonomy editor
    remove_action( 'admin_init', 'genesis_add_taxonomy_seo_options' );

    The first line of code removes the SEO metabox in posts/pages/custom post types. The post editor is already looking cleaner!

    WordPress block post editor without Genesis SEO settings section
    Now there’s less distraction while writing a post!

    The second line of code removes the SEO settings menu from the left sidebar in the dashboard. If we’re not using it at all, no reason to have the settings page!

    Finally, the last line of code removes the SEO settings from taxonomies. That means that you won’t be able to access them on categories, tags, or any other custom taxonomies on the site.

    And with that, we’re done! Three lines of code (plus a bit of spacing and comments to make it easier to read and remember what we did that for later), and we’ve removed access to the Genesis SEO settings. Again, this isn’t a knock on Genesis, but simply a way to clean up your site a bit if you’ve already invested in another SEO tool for WordPress.

  • When to use isset(), empty(), and is_null() in PHP

    I’ll be honest: most of the posts that I write are either because I’ve solved a problem for a client, or because I solved a problem that Past-david created. This is one of those PD problems, where I wrote some code that stopped functioning. When I looked into it, it turns out that I was using the wrong function to test for a variable in PHP.

    There are a variety of functions made to test the state and value of variables, including ones that can tell you if there is anything available to use at all. Three of these functions that are easy to mix up are isset(), empty(), and is_null().

    Built-in Variable Testing Tools

    All three of these functions are built into PHP, so they should always be available for your use when writing code. empty() and isset() are language constructs, while is_null() is a standard function. We’ll go over why that’s important later in the article.

    Before I discuss the difference and show a few examples, here are the descriptions for empty(), isset(), and is_null() from the php.net manual.

    empty()

    empty ( mixed$var ) : bool

    Determine whether a variable is considered to be empty. A variable is considered empty if it does not exist or if its value equals FALSEempty() does not generate a warning if the variable does not exist.

    isset()

    isset ( mixed$var [, mixed$... ] ) : bool

    Determine if a variable is set and is not NULL.

    If a variable has been unset with unset(), it will no longer be set. isset() will return FALSE if testing a variable that has been set to NULL. Also note that a null character (“\0”) is not equivalent to the PHP NULL constant.

    If multiple parameters are supplied then isset() will return TRUE only if all of the parameters are set. Evaluation goes from left to right and stops as soon as an unset variable is encountered.

    is_null()

    is_null ( mixed$var ) : bool

    Finds whether the given variable is NULL.

    What’s the difference between these variable testing functions?

    You can see from the above definitions that these three functions do similar, but not the same things. You’ve gotta determine if you’re trying to test for whether a variable is null, true or false, and whether the variable has been declared.

    When to use empty()

    If you are using empty() you can test if a variable is false, but also if the variable does not exist. This function is best used when you want to ensure both that the variable exists, and has a value that does not equal false. Note that PHP will treat empty strings, integers of 0, floats of 0.0, empty arrays, and the boolean value of false as false. So basically, only use empty() when you want to ensure that there is some actual value to the variable.

    Since you don’t have to declare variables before using them in PHP, you can get in a position where you are trying to perform actions or run other tests on a variable that hasn’t yet been declared. While it’s best practice to declare your variables before use for this and other reasons, this gotcha is one of the reasons that empty() is used differently from isset().

    When to use isset()

    If you are using isset(), you can test specifically if the variable has been declared already, and that the value is not null. So as long as you have a declared variable that has a value set and is not of the value NULL, you’ll return true when you test it with isset(). This would be a good condition to check before doing other checks to perform actions on a variable:

    // Declaring our variable
    $variable = 'Some String';
    
    // Testing that our variable exists, then testing the value
    if ( isset( $variable ) && $variable !== 'Some Other String' ) {
        echo 'This code evaluates since both of the above are true';
    }

    In the above example, we’ve declared our variable as a string, then tested if the variable is set (it is), and if it is not equal to a different string (it is not). Since both of those tests are true, we would then echo out the sentence in that conditional statement.

    Should you use is_null()?

    Finally, is_null() works in a similar manner to isset() as its opposite, with one key difference: the variable must be declared to return true, provided that it is declared without any value, or is declared specifically as NULL.

    I said above that isset() tests whether a variable has been set or not, which is true, but it can handle no variable being set and providing an output of false. That is helpful if somewhere else in the code the unset() construct has been used to remove a variable from scope entirely.

    In contrast, is_null() would not only not properly evaluate, it would also return a notice due to its inability to evaluate. Usually that’ll look something like this:

    Notice:  Undefined variable: variable in /directory/to/code.php on line X

    Since isset() is both a language construction, and can handle variables that aren’t declared, I’d generally recommend it over using is_null() in any situation. If you need to use is_null(), I might suggest finding a way to rewrite your code instead.

    Language Construct vs. Built-In Function

    I mentioned before that isset() and empty() are both language constructs in PHP, where is_null() is a built in function. Language constructs are reserved keywords that can evaluate whatever follows them in a specific manner. That means that it already knows what to do without having to find the definition of the construct like it would a function.

    The main things to keep in mind between the two when evaluating your code is that language constructs in PHP are slightly faster (but honestly not enough to worry about for speed optimization), they can’t be used in variable functions, and they don’t throw any errors when evaluating variables that don’t exist.

    Many times I see warnings and notices because a variable hasn’t been declared, and no one has confirmed that the variable already exists before trying to do some other conditional check with it. Using isset() and empty() can go a long way to avoiding those errors.

    Examples of output of these three functions

    The following table has been taken directly from a demo created by Virendra Chandak on his personal site. You can view the demo here.

    Value of variable ($var)isset($var)empty($var)is_null($var)
    “” (an empty string)bool(true)bool(true)bool(false)
    ” ” (space)bool(true)bool(false)bool(false)
    FALSEbool(true)bool(true)bool(false)
    TRUEbool(true)bool(false)bool(false)
    array() (an empty array)bool(true)bool(true)bool(false)
    NULLbool(false)bool(true)bool(true)
    “0” (0 as a string)bool(true)bool(true)bool(false)
    0 (0 as an integer)bool(true)bool(true)bool(false)
    0.0 (0 as a float)bool(true)bool(true)bool(false)
    var $var; (a variable declared, but without a value)bool(false)bool(true)bool(true)
    NULL byte (“\ 0”)bool(true)bool(false)bool(false)
    Fediverse Reactions
  • Fix Missing Leading Zeroes in WordPress Zip Codes

    Recently, I helped a client import a large set of addresses into a location plugin for WordPress. The import mainly went smoothly, but we noticed some issues when searching in areas with zip codes leading with one or two zeroes. The addresses weren’t coming up as they should.

    After examining some of the imported addresses, we realized that all of the leading zeroes were being stripped, and we could no longer search by those zip codes. I’m going to give a brief overview of why this happened, and how I solved it. Hopefully it helps if you need to make this kind of update to a WordPress database too!

    Why is this happening?

    Some programs “helpfully” strip leading zeroes from numbered cells, including Excel, Numbers, and Google Sheets. This means that 04102 in Portland, Maine becomes 4102, which isn’t a zip code in the US.

    The same could happen upon import into the database, depending on how the import is done. In either case, I’m working with an import that’s already complete, as opposed to having caught this issue before the addresses were added to the site. I don’t want to remove all other relevant content just to import again and fix these zip codes, so I’m going to go directly to the database to solve the problem.

    How to fix the missing zeroes

    There are several ways to add the zeroes back, but most places that you search will suggest changing the datatype of the zip code column, which doesn’t help when it’s in WordPress where we can’t modify that when there is other info stored in the same place. Plus some zip codes have the full nine digit route number depending on where the data was taken from, and some are postal codes from Canada and other countries that don’t follow the same pattern.

    In this particular case, we know what we’re looking for (postmeta with a key of wpsl_zip, and we know where it’s at (the wp_postmeta table). If you connect to the MySQL database through PHPMyAdmin or an external application you can run the following query to see how many zip codes stored have fewer than five digits:

    Important: Always make a backup of your database before doing any of the changes below!

    SELECT
        *
    FROM
        `wp_postmeta`
    WHERE
        `meta_key` = 'wpsl_zip' AND LENGTH(`meta_value`) < 5

    What we’ve told the database to do, is to “select all rows from the wp_postmeta table that have a meta_key of ‘wpsl_zip’, and that have a meta_value of less than five characters in length”.

    It’s important to ignore rows that already have a value of five or more characters, as LPAD will trim them to fit five characters otherwise. We don’t want that, just the ones that are too short.

    The above will return all of the rows that match the query, so that we can review them and confirm that they are indeed the addresses that we want to update.

    Now that we’ve identified how many there are (89 in this case), the following MySQL command will update those zipcodes using LPAD to add a left padding of 0’s until the meta_value is five characters. Values that are already five characters or larger are ignored.

    UPDATE
        `wp_postmeta`
    SET
        `meta_value` = LPAD(`meta_value`, 5, 0)
    WHERE
        `meta_key` = 'wpsl_zip' AND LENGTH(`meta_value`) < 5

    You’ll see that the WHERE clause is the same, since we already confirmed that we had the right records to change before. What we’ve done differently with this query is to say that we want to make updates to the wp_postmeta table by setting the meta_value of the rows that we selected to have exactly five characters, and that if they have fewer than five characters, to left pad them with 0’s.

    Summary

    To review, the MySQL function LPAD works like this:

    LPAD(
        "cell that we want to change",
        "final cell string length",
        "what to use to left pad the cell if needed"
    )

    I hope that helps save you spending the same time that it took me to find the problem that I had and to come up with a solution!

  • Setting up a Custom Palette in Gutenberg

    Setting up a Custom Palette in Gutenberg

    While there’s been a lot written about the new editing experience that came out with WordPress v5.0 last month, I want to give a reminder of some of the neat features for end users. One of the best things about the new editor is that a theme or plugin can add or remove features from the editor with simple hooks, allowing you to craft an experience that fits your needs.

    As an example, I have taken a few client sites that have embraced the new editor, and used their style guides to add their branding colors, fonts, and variants into the page editor. Now, when they want to add a block of content with a colored background or change the color of a button on a page, they have their palette of brand-approved colors already set to use. No need to remember hex codes or anything confusing!

    Sounds great! How do I set up a custom color palette?

    Default WordPress Editor Color Palette
    Notice that the editor will warn you if your background and text colors aren’t high contrast. This makes it a bit easier to keep your content accessible!

    By default the editor will have a palette of 11 colors, plus a color picker to get a different color. You can swap to a palette of your own by adding some code to your theme. Place the following in your functions.php file or where appropriate based on your structure. Next, we’ll modify it to fit our needs.

    This code came directly from the Gutenberg Theme Support Handbook, a good resource for all WordPress developers.

    function mytheme_setup_theme_supported_features() {
        add_theme_support( 'editor-color-palette', array(
            array(
                'name' => __( 'strong magenta', 'themeLangDomain' ),
                'slug' => 'strong-magenta',
                'color' => '#a156b4',
            ),
            array(
                'name' => __( 'light grayish magenta', 'themeLangDomain' ),
                'slug' => 'light-grayish-magenta',
                'color' => '#d0a5db',
            ),
            array(
                'name' => __( 'very light gray', 'themeLangDomain' ),
                'slug' => 'very-light-gray',
                'color' => '#eee',
            ),
            array(
                'name' => __( 'very dark gray', 'themeLangDomain' ),
                'slug' => 'very-dark-gray',
                'color' => '#444',
            ),
        ) );
    }
    
    add_action( 'after_setup_theme', 'mytheme_setup_theme_supported_features' );
    

    There’s a lot of code there, but not a lot to break down. First, remember that after_setup_theme is a hook, on which you add the function mytheme_setup_theme_supported_features that you’re creating. In that function we’re using add_theme_support, a built in WordPress function, where we’re using editor-color-palette to set our palette up.

    We’re adding an array of colors, and each element of that array is itself an array. Within those nested arrays we have the name of the color, which we’re making translatable with the __() function, and setting the textdomain of our theme. Change themeLangDomain to whatever matches your theme. This name is a descriptor for when you hover over it in the palette.

    The slug is a string of how you’ll refer to the color elsewhere in your code. The color is the hexadecimal value of the color that you want in your palette. With the above code, you’ve got a new editor palette with four colors that you’ve set, along with the color picker.

    Our custom WordPress editor color palette
    Our four custom colors now appear, along with the color picker

    Adding to Our Palette

    There are a few more features of the editor color palette that I’d like to show off, including targeting blocks in CSS, Customizer set colors, and removing the color picker.

    Using our Color Palette Selections in CSS

    If you’re editing text with the color palette you shouldn’t have to make any other changes. But what if you want to use the color selection in something a bit more customized, or in your own block type?

    The slug that we added to our colors in the example above lets us target for both background and text colors. We don’t even need to use the color set in the editor, but something custom to our needs. For example, you may want a specific background or text color when you use the strong magenta color. In that case, here’s the CSS that can target the classes added when we use that color:

    .has-strong-magenta-background-color {
        background-color: #313131;
    }
    
    .has-strong-magenta-color {
        color: #f78da7;
    }

    Setting a Color Palette with the Customizer

    The twentynineteen theme that comes with WordPress has a custom palette that includes colors that can be set in the Customizer. This means that you can set your own primary and secondary color from the WordPress dashboard, without changing code!

    array(
    	'name'  => __( 'Primary', 'twentynineteen' ),
    	'slug'  => 'primary',
    	'color' => twentynineteen_hsl_hex( 'default' === get_theme_mod( 'primary_color' ) ? 199 : get_theme_mod( 'primary_color_hue', 199 ), 100, 33 ),
    ),
    array(
    	'name'  => __( 'Secondary', 'twentynineteen' ),
    	'slug'  => 'secondary',
    	'color' => twentynineteen_hsl_hex( 'default' === get_theme_mod( 'primary_color' ) ? 199 : get_theme_mod( 'primary_color_hue', 199 ), 100, 23 ),
    ),

    The new color is now set as the output of a function that will get a theme mod, if you’ve modified the color. If not, it’ll return the default, ensuring that there’s always a color set.

    The WordPress customizer with a primary color selection

    Removing the Color Picker

    You can also do things like disable the color picker, to ensure that users can only use the colors that you have preset for them. Doing so requires just one line of code in your functions file:

    add_theme_support( 'disable-custom-colors' );

    With that single line we’ve made it so the beautiful design that we’ve worked so hard to craft and the branding style guide that we have had to constantly review will always be set the way that we want.

    Wrapping Up

    As you can see, there’s a lot that you can do to change how users edit content in the Gutenberg editor, without having to add a tremendous amount of code.

    This is only the beginning, and even more developer and user friendly features like this already exist or are coming to the editor and the rest of WordPress. I’m excited for the new opportunities this gives to all stakeholders of a site, from designers and developers, to admins and editors, all the way to customers and visitors. Let’s keep making WordPress better for everyone!

    Fediverse Reactions
  • Powering Up Homebrew on Mac with Alfred

    Powering Up Homebrew on Mac with Alfred

    I’ve mentioned before on the blog that I use Alfred App for OSX and love it. The app helps me do a lot more things quicker, without having to leave the keyboard.

    I also use the Alfred Powerpack, which is currently £39.00 for lifetime updates. In US Dollars, that’s $50, which I was quickly able to determine with a currency exchange workflow 😉

    Converting currency from GBP to USD
    Lots of quick things can be done via Alfred!

    The Powerpack includes quite a few extra features, but I make regular use of clipboard history, snippets, auto-expansion, and running shell commands, as well as styling it with a theme and backing up all of my settings

    Using Alfred with Homebrew

    I also use Homebrew, which is a package manager for OSX. Basically, it’s a way to install and update applications for your mac via the command line. Since I’ve already written some posts about it in the past (as well as how to create the workflow that I’m discussing today), I’m going to refer you back to those posts instead of reiterating them.

    Why write this post again?

    I have always gone to the terminal, used brew search (and the now deprecated brew cask search to look for applications that I wanted to install. But this meant opening terminal if it wasn’t already, typing the name that I hoped was there, and seeing what came up while guessing if it was the right app when installing.

    I recently discovered an Alfred workflow meant specifically for Homebrew tasks, which allows you to do all of the normal Homebrew commands, including searching packages. You can find Homebrew and Cask for Alfred on Github, and it’s already wrapped up as a workflow to install.

    I can still use my existing homebrew workflow to update all existing packages that I’ve installed, as well as cleanup when done. Thanks to some updates since the last post about this, there are even fewer tasks to run.

    But now I also have access to the normal homebrew tasks, including install, uninstall, search, update, and all of the flags and various commands for them. Even better, when you search for a formula it includes a link to the Github page for it, meaning I can see what that package actually does and not have to guess. Again, this is without ever having to leave the keyboard.

    Alfred Homebrew search
    Searching the word lint will give all formulas with lint in the name

    Having tools like this allows me to work faster and waste less time on managing applications, as well as keeping them all up to date easier. I already procrastinate enough, and I don’t need searching for apps or waiting for them to update when I open them to help me waste even more time!

  • Fixing Style Issues While Editing Beaver Builder

    Fixing Style Issues While Editing Beaver Builder

    I’ve started using Beaver Builder with a few clients after having played with it a bit and hearing lots of great reviews. I’ve looked into multiple WordPress Page Builders, and have had experience with quite a few of them through my work offering WordPress maintenance service.

    I’ve found that Beaver Builder is able to handle a lot of the customizations that my clients may want to make, but there are still a few things that I have to setup externally to get a feature that they want. As an example, a client wanted to use the callout module to make an entire box clickable, not just a button after text and images.

    Doing the above was fairly straightforward for this use-case: I set the entire callout link to be relatively positioned in CSS, so that I could absolutely position the anchor tag within the link to be the full height and width of that box. Finally, I added a hover and focus state to the button so that when hovering with the mouse or focusing with the keyboard there would be a visual indication that it was clickable, besides the cursor icon that was already set.

    .callout-link {
    	position: relative;
    }
    
    .callout-link a {
        position: absolute;
        width: 100%;
        height: 100%;
        top: 0;
        left: 0;
    }
    
    .fl-callout-button a:hover,
    .fl-callout-button a:focus {
    	box-shadow: 1px 1px 3px 0 #315E7D;
    }

    So what’s the issue?

    That looked like a simple solution to the problem that we had, but like many bits of code, I inadvertently created a new issue.

    Beaver Builder is a front-end content editor, which means that it uses the same HTML and CSS structure to display the content while editing. While this is normally a good thing, it means that you need to pay attention to custom code that you’ve added to modify Beaver Builder.

    Since I changed the layout of links in the callout module, I changed the layout of links for the editor of that module. Additionally, I’d styled unordered list bullets with pseudo-elements, which also caused a display issue. This is what the editor looked like when I tried to modify those links:

    Broken Beaver Builder editor CSS
    This is what happens when you let me touch code!

    After I determined that I was the cause of the issue, I set about to fix it. Thankfully, Beaver Builder adds several body classes while the page editor is open, including the class fl-builder-edit which I used to fix this particular issue. I hid the li::before pseudo-elements, and restored the link anchor to relative positioning.

    /* Beaver Builder Editor Fixes */
    .fl-builder-edit .entry-content ul li::before,
    .fl-builder-edit .fl-builder-content ul li::before {
    	display: none;
    }
    
    .fl-builder-edit .callout-link a {
        position: relative;
    }

    With that code in place, the editor layout looked as it should before I mangled it.

    Fixed Beaver Builder editor settings
    That’s a lot better and actually usable!

    Check for unintended consequences of your code.

    This broken CSS wasn’t a major problem, and was thankfully easy to fix. But it did bring up a good reminder: when you make one change to your code, you may change something else that you didn’t mean to. It’s always good to review every time that you make a change. Having some version control in place that you use regularly doesn’t hurt either!

    Fediverse Reactions
  • Display a Notice for New WordPress Posts

    Display a Notice for New WordPress Posts

    If you’re like me, it might not always be easy to get new posts out to your blog. I’m trying to keep a new tech-tip going every regular weekday for a while to see how I keep up with that.

    Since my content might not always be the newest, I may want to highlight when something was recently published.

    Calculate posts published in the last two weeks

    In the following example, I’m going to check to see if a post was published within the past two weeks. If so, I’m going to attach a notice to the title of the post. I’m assuming that the following code is going to go into a loop of posts, or somewhere that we’re already using the correct post ID.

    $post_title = get_the_title();
    if ( get_the_date( 'U' ) >= date( 'U', strtotime( '-2 weeks' ) ) ) {
        $post_title .= ' — New Post!';
    }
    echo $post_title;

    First, on line one, we’re creating a variable in PHP called $post_title. This will hold the title of the post, which we get with the built-in WordPress function get_the_title(). Again, I’m assuming that we’re already in a loop for a specific post, but if not you can pass the ID of the post as an argument in that function.

    Next, line two is going to get the date that the post was published in Unix Timestamp format. I’ve put it into that format to make it easy to compare. I am grabbing the date instead of the exact time since it doesn’t really matter to me if it was exactly within two weeks down to the second, just generally two weeks by day count.

    The post publish date is compared to the current time minus two weeks, also in Unix Timestamp format. The PHP function strtotime() allows you to use human readable formats for time conversions, which we’re using to say “give me the time in Unix seconds for two weeks ago”.

    If that comparison is true and the post was published less than two weeks ago, we’re going to append the text ” — New Post!” to the post title. By using a period followed by the equals sign, we’re saying that we want to concatenate, or add the new value to the existing variable.

    Finally, on line five we’re echoing out the value of $post_title, meaning we’re printing it to the screen. So if I were to use the above code to display titles for this site and this post was published less than two weeks ago, the title would display as Display a Notice for New WordPress Posts — New Post!

    How else could this be used?

    One way that I use this code is for a custom post type that displays properties for sale for a client. They wanted to highlight some recent listings, and using this code along with some CSS let me put a fancy ribbon on the corner of property listings, as well as list the number of days that the home has been on the market.

    Property Listing with new listing notice and number of days on the market

    If you have the need to calculate WordPress post publish date compared to the current date, I hope the above snippet has been a good place to start!

🌙 ☀️